Have you ever wanted to design your very own granny square? It may be easier than you think.
The wonderful thing about designing your own granny square is that the designs can be endless. It really just depends on how creative you are and how skilled you are with different stitches. Imagine designing a square that has never been seen before and turning that into a blanket of your very own design?
In this article I offer some beginner tips on how to design your own granny squares, whilst designing a square as I write, moving beyond the traditional granny square to playing with different stitches and having some fun with layouts. If you follow a basic concept that a square has four sides and understanding that that will need a stitch count that can be easily divided into 4 then you'll be well on your way to designing your own squares.
Let's design a square right now! The finished written pattern will be at the bottom of this article.
Step 1 - Beginning Round
Let's start with round one. This round can be very simple, but we'll need to take into account what yarn weight we're using as that will depend on whether we start with 8, 12 or 16 stitches. The thinner the yarn, the more your stitch count will need to be 16, the thicker the yarn, the more likely your stitch count will need to be 8, but let's add some chains in-between to make it fun. The most important factor is that it sits flat and your stitch count is divisible by 4 because a square has 4 sides.
I have a super chunky/super bulky weight yarn with me, with that I'll be using a hook size of 6mm so I'm going to crochet 6 half double crochets into a chain 4 loop with a single chain in-between to equal 12 stitches in total. For the first few rounds you're most likely be working in a circular fashion. This is absolutely fine.
 Step 2 - First Interesting Round
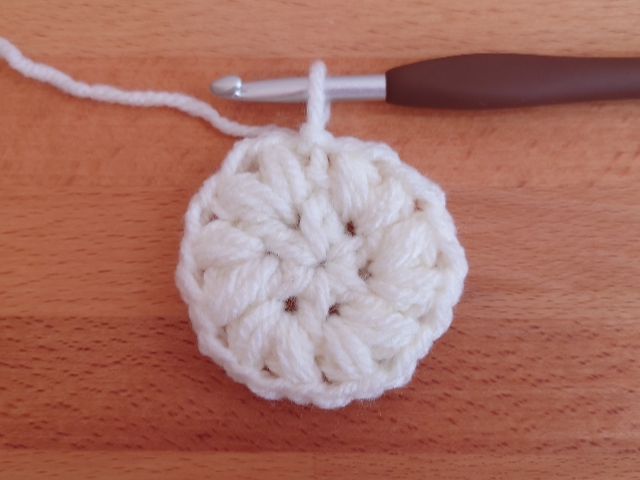
Round two is the round to start introducing some more interesting stitches. You can of course keep things simple, but for my round two I'm going to mix it up with some puff stitches. I have no plan other than that I would like some puffiness to my square. I have 4 chain 1 spaces in-between my half double crochets so I'm going to add 2 puff stitches into each chain 1 space to keep things even. To start off I'll need to slip stitch over to the first chain 1 space to begin. I'll also add an extra chain 1 in-between each puff stitch to create some space.
If I feel there's too many puff stitches and it's becoming too bulky, I can always alternate between 2 puff stitches in one chain 1 space and then 1 puff stitch in the next one by itself, but it's looking okay so far so I'll stick with two in each. Again just make sure things sit flat when you work.
 Step 3 - Adding Flair
The next round will depend on how thick your yarn is and how big you want your square to be. I'm just going to add one more circular round before I start to square things off otherwise my square might end up too big, not that that's a bad thing of course, but I want to keep things simple for now. The thinner your yarn the more flair rounds you'll want to add.
I have 12 puff stitches with chain 1 spaces in-between. I don't necessarily need to know the exact stitch count as I know I have a division of 4 because I have 12 puff stitches. So what can I add here? I could add more puff stitches, but maybe some simple picot chains would be more interesting than just repeating the previous round. Again I'm going to slip stitch over to my first chain 1 space, I like to do this for consistency and then I think I'll work 5 chains then slip stitch into the next chain space. This will create a flower design and more interest.
 Step 4 - Squaring things off
Okay, so I think I've crocheted enough rounds now and it's time to square things off. My flower design is sitting flat, which is a must and I now have 12 large picots to play with. I need to divide my 12 picots into 4 to make a square, so that's 3 picots for each corner.
When squaring off a design you will need to use small stitches and large stitches. The smaller stitches will be along the edges and the larger stitches will be at the corners. Again I am going to slip stitch into my first 5 chain picot and then chain 1 so my work is sitting above it because I want to add some single crochets into this first picot. Let's add 2 single crochets into this first 5 chain picot. Then I'll chain 1 to reach the next picot.
In the next picot, which is my middle picot of the 3 I will need to add the larger stitches to begin to create a corner, so I'll add a half double crochet then build up to a double crochet plus 2 chains to really square it off, then reverse that back down with a double crochet and a half double crochet again. That will make a nice corner shape.
After working this though I've realised my work is starting to buckle up and not sit flat. I think adding the extra chain 1 in-between my picots was too much so Ill go back and remove it. This first corner is a good test for the other 3 corners so we want to get this corner perfect before we finish the round. I will finish up with 2 single crochets in the last third chain 5 picot of my corner. Then I just need to repeat that pattern for the whole round.
After finishing my round, my square actually now curls inwards. I have too few stitches now so how can I fix this? Adding a chain 1 in-between each picot was too much, so I think I'll just add an extra chain 1 in-between each corner sequence, so in-between the two sets of single crochets.
Unfortunately when you're designing you'll be frogging your work a lot so be patient with yourself. Don't rush the process. If it's not sitting flat, just take some time to think of how you can add extra stitches or remove stitches in a symmetrical way. Don't make things uneven by removing stitches one side but not the other as this will look messy and untidy at the end. You want a high quality square that's mathematically pleasing, even if you're bad at maths!

That worked great. Just adding those extra chains on each side was just enough to get it to sit flat.
Step 5 - Finishing things off
This last round (
you may add more of course) is just a simple round to finish off your square. If we stopped after squaring it off, our square can still look slightly rounded or messy so adding an extra round or two will make it look even more square.
My yarn is pretty thick so my square is quite big now so I will be just adding one final round. I'm going to keep it simple with just half double crochets along the edge and... oh wait, can I still do something fancy? Let's add some front post treble crochets along the way! I have some nice spokes from round 3 I can crochet around so let's use them. This will mean I'll be adding an extra stitch I don't need so I'll remove one of the half double crochets along the edge.
So far I've worked 2 half double crochets, a treble crochet front post stitch, then I've skipped the next stitch and then added 1 last half double crochet. Now I'm at the corner space. For the corner I'm going to add some slightly bigger stitches and some chains again to keep those corners sharp. I'll add a double crochet, 3 chains this time and another double crochet in the 2 chain space.
If my test corner sits flat I should be good to continue. It does, great! The front post trebles pull it in slightly, but it does still sit flat when pressed so let's repeat that all around. I'll just skip the chain one space along the edge.

And that's it! I'll slip stitch to join my round and then fasten off. We now have a unique square never seen before, designed on the go. Did you manage to follow along with my design process? Do you think you could give it a try and design your own square? Remember! Just keep to that divisible by 4 stitch count because a square has 4 sides, go slow and make sure your work sits flat, think symmetrical, but don't be afraid to get creative!
Here's the full written pattern for you to try! I think it would lovely if we added different coloured yarns. What do you think? The front post trebles look like little hands reaching in as if to help and pull it all together so let's call this the Hands of Peace Granny Square.
For my puff stitch: *Yarn over into stitch, yarn over, pull up loop* repeat from * to * twice more, yarn over pull through all loops to finish.
Hands of Peace Granny Square
Round 1
[1hdc, ch1] 6 times into a chain 4 loop, sl st in first hdc to join - (12)
Round 2
Sl st over to first ch1sp, [1 puff st, ch1, 1 puff st] in same ch1sp, ch1, *[1 puff st, ch1, 1 puff st] in next ch1sp, ch1* repeat from * to * until end, sl st in first puff st to join - (12 puff sts)
Round 3
Sl st over to first ch1sp, *ch5, sl st in next ch1sp* repeat from * to * until end, ending sl st in same first ch1sp - (12 loops)
Round 4
Sl st in first ch5sp, ch1, 2sc in same ch5sp, [1hdc, 1dc, ch2, 1dc, 1hdc] in next ch5sp, 2sc in next ch5sp, ch1, *2sc in next ch5sp, [1hdc, 1dc, ch2, 1dc, 1hdc] in next ch5sp, 2sc in next ch5sp, ch1* repeat from * to * until end, sl st in first sc to join, ch1
Round 5
*1hdc in next 2 sts, 1tr fps around 5ch post below from round 3, skip next st, 1hdc in next st, [1dc, ch3, 1dc] in next ch2sp, 1hdc in next st, skip next st, 1tr fps around 5ch post below from round 3, 1hdc in next 2 sts, skip ch1sp* repeat from * to * until end, sl st in first hdc to join. Fasten off and tie in all ends.